
Peacocks: Post 3 - The Aviary

Updated: Oct 14
To the manor born.
I've always wanted to live in a grand country estate. But in reality I live on a council housing estate. Ah well. If i did live in a huge country estate I'd have peacocks. I think they are splendid birds.
So while I'm waiting for my country estate dream to materialise I thought I'd get to work on the parts of the dream I can actually do now.
The inspiration for the structure came from playing crazy golf at the Dundonald Pirate Crazy Golf . I liked the look of their shacks and hut structures with the artificial tiki-thatched roofs. The more I looked at them the more i thought... I could make something like that.

Where to get a Peacock.
I'd seen plenty of peacocks at Belfast Zoo, Seaforde Country House and various other places in Northern Ireland so I knew that they were resilient enough to our climate. I also did some research regarding keeping them, what they eat, what they require in terms of shelter and temperatures and exposure. But not having ever bought a peacock in my life I thought I'd better find out where to get them and what they cost. I settled on and visited Alex Birds in Kilkeel, a supplier of birds with a fantastical menagerie of all manor of things. Having talked things over with him I agreed to buy a mating pair later in the summer once I'd had time to build an aviary for them.
Backyard Civil Engineering.
If i was going to have an bird house big enough to support a pair of peacocks then it was obviously going to be pretty substantial and visually impacting! No budgerigar cage this one! So it was a priority that it be pleasing on the eye. At uni I had really enjoyed the structural engineering and bridge engineering modules of my degree and I haven't often had a chance to use that part of my brain. So I quite relished the opportunity to design and construct something all by myself and see if it would fall over or stand up. Luckily for me there was already a concrete slab in place and i only needed to build up from it. I used the extents of the pad to set the maximum footprint of the aviary.
Thatching ordered
I researched thatching and ended up ordering a load of artificial rubberised thatching from china. It took a long time to arrive and came in a box like this. It was pretty expensive too. I just hoped that I'd got my quantity estimates right!

Building an aviary
I set to work with a pencil and backs of envelopes to sketch out a frame that I could build with simple hand tools and the local hardware shop. In the next photo you can see the beginnings of the roof frame being set out on the concrete pad.

Lightweight enough to lift.
A major challenge was designing the structure around the process of how it would be erected. Given that there was only one of me with two hands and some clamps how on earth would I build and thatch a lightweight roof?
I opted to use treated decking boards as they are intended for exterior use and are efficient section size so are pretty strong if oriented in the right direction - whilst being light. I would have four corner columns and a fifth column at the midpoint of the long span at the back and two at the front that would also serve as door framing. To avoid planning permission I would have the whole thing simply sitting on the concrete deck under its own weight as a non-permanent structure. There would be a horizontal top ring and a horizontal bottom ring that the uprights would secure to. To counter/prevent shearing of the structure (e.g. wind-loading) the uprights would be braced by diagonal struts/ties from these horizontal rings. Enough stiffness would need to be provided by these corner braces alone.
Hoisting mechanism.
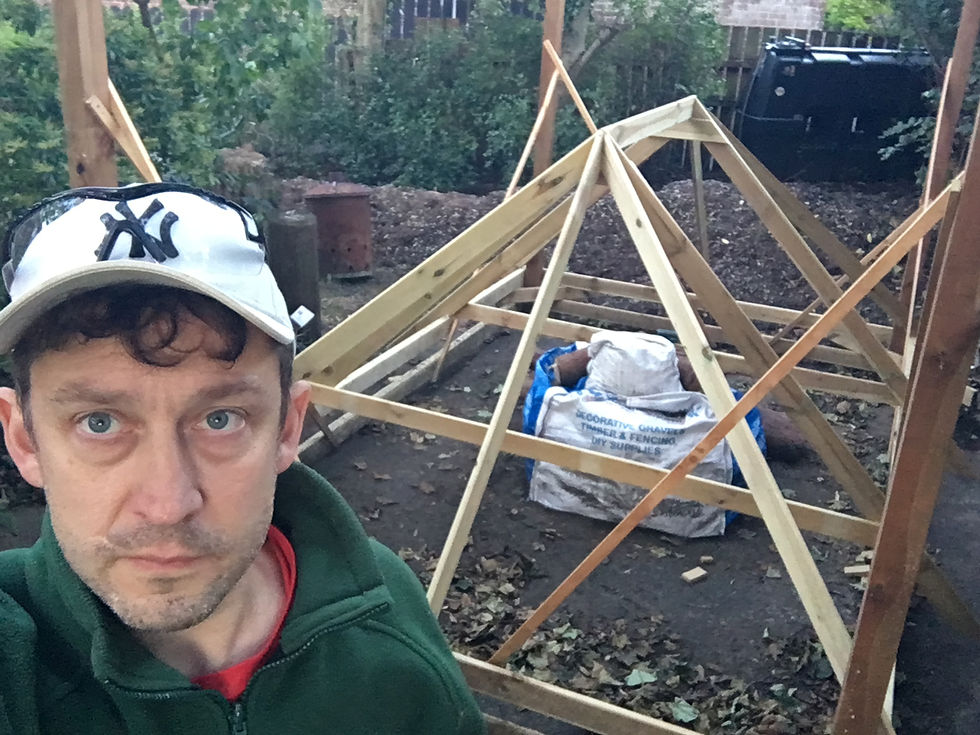
In order to erect the thing by myself i needed some kind of hoist system. I figured I could use the four corner upright columns for this. So i designed the roof so that the joists would sit on a horizontal ring that could run up and down the four corner columns by means of fixing some pulleys on the column tops and hanging some 10kg weight disks to counter the roof weight. In the photo below you can also see the first iteration of the dormer window where the top beam is sloped. I decided against that design later and reworked it as a horizontal member instead of sloped. You can see that in the photos that follow it.

In the above photo you can also see that the bottom ring running around the structure is in place and the diagonal corner bracing is in place to secure the columns in an upright position during hoisting of the roof. The horizontal ring is deliberately an inch above the slab to avoid the wood sitting permanently on wet or ponded concrete. Raising the roof.
One of the reasons for having a roof that could be raised and lowered in this way was my concern about maintenance. Being a light weight design the roof was not intended to carry a person's weight. It is designed for moderate wind loading given that it has permeable tiki thatching only. This means that it would need to be thatched at ground level and then the whole thing raised up. The plan was that in a number of years as and when the thatching would need to be replaced or repaired that the roof could be lowered to facilitate it. Urr.. yeah nice idea that! I hadn't really thought that one through! Lol.

Securing the aviary
We get a lot of foxes here as I am across the road from the forest park. I needed chicken wire or netting to keep the birds in. I also needed to keep foxes out. A fox would easily break through chicken wire so I used a welded wire with sufficiently small grid size to prevent cats and foxes squeezing through. I bought a staple gun and stapled the wire mesh to the roof beams to fully enclose it. The thatching could then be fixed quickly to the mesh with cable-ties. The only difficulty I had with this process was the corners. The thatching doesn't really go around diagonal slanted corners. It just cannot logically do that without leaving massive gaps. So a lot of trial and error "fluffing" and sort of alternating panel fronds over each other was the best i could do at the corners. I hadn't anticipated that problem. And i still don't really have a solution.
Proud builder.
Here I am looking all proud of my work. The rabbit hutch and the door were a find - I found them fly-tipped elsewhere on the estate and thought they were perfect for the coop.

Missing walls.
At this point all that remained to do was to staple the rolls of wire mesh to the uprights and the door joists. Having done that I went to the garden centre to get some rolls of bamboo screening. The purpose of the screening was three-fold; aesthetics from the outside, privacy for the peafowl inside, and wind shelter. It was important to me that the birds would feel safe and secure and not feel seen with nowhere they could hide. At the same time, prey animals don't want to feel trapped in something solid. So bamboo screening seemed to me to be a good compromise - something they can see out from like being in a bush, but obscures them to onlookers. The wind shelter was also an important part of it. The garden is pretty sheltered from the wind anyway, but since the roof is not water tight - more akin to sheltering in the branches of a tree - then the last thing a bird wants if it is wet is to be wind-blasted. The rabbit hutch I thought might prove useful for them during downpours or gales or just a chicks. However they rarely ever go in it.

Time to wash my hands, put the kettle on ... and call Alex about collecting the peafowl !

Comments